Structure of List View
By default all output produced by RADICORE components is in HTML format so that it can be displayed in the browser window. However, there may be occasions when some other format is required, such as CSV (Comma Separated Values) so that data can be imported into a spreadsheet, or PDF (Portable Document Format) so that a printable file can be produced.
In order to cater for different output formats a new series of output patterns has been created, and the purpose of this document is to describe how to use these patterns to create PDF documents with a variety of structures.
All HTML pages produced by RADICORE are generated from XML documents which are transformed using XSL stylesheets. Although XSL-FO can be used to transform an XML document into printable format, this requires an additional third-party component (such as FOP from Apache) before it can be converted into a PDF document. This seems like too many steps, and perhaps not very efficient, so it has been decided to eliminate the creation of an intermediate XML document and produce PDF output direct from the database data by using the TCPDF library. This means that instead of reading all database records, writing out the data from all those records to an intermediate file, then transforming the contents of that intermediate file into the desired output format, each record is read in then written out to the PDF document before the next record is read in.
Please note that the PDF document is constructed in memory, so avoid giving it overly large amounts of data to process. This may cause the PHP process to run out of memory, or it may run out of time.
In order to make it easy to produce PDF documents from database data in standard data structures the following files have been introduced into the RADICORE framework:
Each of the transaction patterns described below will access the database through a single database table class, but this does not mean that the contents of the output are restricted to data from that single table. The report will use the contents of the object's internal fieldarray, and this can be constructed in a variety of ways:
There is also the option in Detail view to make callbacks to the database object so that it can provide additional data which can be appended to each page. Please refer to Body contents (detail view - additional data) for details.
By default the number of database records retrieved is not controlled. It is governed entirely by the selection criteria passed down by the previous task (although this may be overridden) which may or may not include a primary key. If it is necessary to restrict a particular report to a single database record this can be achieved by setting $this->checkPrimaryKey to TRUE in the _cm_pre_getData() method. This will cause any selection criteria which does not include the primary key of the current database table to be rejected. As it is possible for the user to select more than one primary key it is possible to limit the number of rows retrieved to 1 by setting $this->rows_per_page to 1.
With HTML it is possible to create a document which contains style names where the attributes of those styles can be specified in a separate CSS file. It is only when the document is rendered by a browser that the style attributes are actually applied to the document to produce a formatted result. This allows the style of the document to be changed simply by switching to a different CSS file which contains different attributes for each of those style names.
With a PDF document all style requirements are built into the document and cannot be changed, thus the document can only be read in the style that it was written. PDF does not understand the concept of style names. Instead a series of style attributes are declared, and those attributes will be used for all subsequent output operations until they are changed.
In order to make it easy to use different styles within a PDF document each of these styles must be defined within a file called pdf.styles.inc. A copy of this file must reside in the subsystem directory, which allows each subsystem to have its own set of styles and attributes. This file will be accessed at runtime, and the relevant style attributes will be applied to each report element as specified in the report structure file.
Here is an example of a PDF style file:
<?php
//*****************************************************************************
// This file contains styles to be used in PDF output
//*****************************************************************************

// heading for LIST view
$style['hdg']['font'] = array('family' => 'Times',      // Font family
                              'style' => 'B',           // Font style
                              'size' => 12,             // font size
                              'height' => 7,            // line height in units
                              'draw' => .4,             // width of drawn lines
                              'stretch' => 'y',         // stretch text?
                              'halign' => 'left',       // horizontal text alignment (left, center, right)
                              'valign' => 'middle');    // vertical text alignment (top, middle, bottom)

$style['hdg']['fillcolour'] = array(24,116,205);        // colour for background
$style['hdg']['textcolour'] = array(255,255,255);       // colour for foreground
$style['hdg']['drawcolour'] = array(128,0,0);           // colour for line drawing

// main body for LIST view
$style['body']['font'] = array('family' => 'Times',     // Font family
                               'style' => '',           // Font style
                               'size' => 12,            // font size
                               'height' => 6,           // line height in units
                               'draw' => .3,            // width of drawn lines
                               'halign' => 'left',      // horizontal text alignment
                               'border' => 'LR');       // L=Left, R=Right, T=Top, B=Bottom, P=Page, 1=All

$style['body']['fillcolour'] = array(224,235,255);      // colour for background
$style['body']['textcolour'] = array(0,0,0);            // colour for foreground
$style['body']['drawcolour'] = array(128,0,0);          // colour for line drawing

$style['body']['ignore_if_empty'] = 'y';                // do not print line if value is empty

// allow text alignment within a cell to be changed
$style['textalignleft']['font']   = array('halign' => 'left');   // text alignment = left
$style['textalignright']['font']  = array('halign' => 'right');  // text alignment = right
$style['textaligncenter']['font'] = array('halign' => 'center'); // text alignment = center
$style['textalignleft_bold']['font']   = array('halign' => 'left', 'style' => 'B');     // left+BOLD
$style['textalignright_bold']['font']  = array('halign' => 'right', 'style' => 'B');    // right+BOLD
$style['textaligncenter_bold']['font'] = array('halign' => 'center', 'style' => 'B');   // center+BOLD

$style['noborder']['font'] = array('draw' => 0);                 // set border width to zero

// barcode styles
$style['barcode1']['drawcolour'] = array(0,0,0);       // border colour
$style['barcode1']['draw'] = .2;                       // border width
$style['barcode1']['type'] = 'I25';         // I25, C128A, C128B, C128C, C39
$style['barcode1']['style'] = 'CDS';        // B=Border, D=Draw Text, S=Stretch Text, N=Negative,
                                            // L=Align Left, C=Align Center, R=Align Right, X=Stretch Image
$style['barcode1']['xres'] = 2;             // 1,2,3
$style['barcode1']['fontsize'] = 5;         // 1,2,3,4,5

$style['barcode2'].....

// this font is for the address labels
$style['address_labels']['font'] = array('family' => 'Helvetica',  // Courier, Helvetica, Times
                                         'style' => '',            // blank=Regular, B=Bold, I=Italic, U=Underline
                                         'size' => 9,              // size in points
                                         'height' => 4,            // line height in units
                                         'draw' => .2,             // width of drawn lines
                                         'border' => 'LRTB',       // border
                                         'halign' => 'left');      // text alignment (left, right, center)

$style['address_labels']['font']['padding_left']   = 4;
$style['address_labels']['font']['padding_top']    = 3;
$style['address_labels']['font']['padding_right']  = 1;
$style['address_labels']['font']['padding_bottom'] = 3;

$style['address_labels']['font']['margin_bottom'] = 2;

$style['address_labels']['fillcolour'] = false;                // colour for background
$style['address_labels']['textcolour'] = array(0,0,0);         // colour for foreground
$style['address_labels']['drawcolour'] = array(0,0,0);         // colour for line drawing

// fonts will be replaced if the language changes
$font_replacement['ja']    = 'kozgopromedium';
$font_replacement['ko']    = 'hysmyeongjostdmedium';
$font_replacement['th']    = 'freeserif';
$font_replacement['zh-cn'] = 'stsongstdlight';

?>
The various components and their options are as follows:
$style['name'] |
This provides a name by which each style can be referenced. The above example contains three full styles, hdg, body and address_labels, and four partial styles, textalignleft, textalignright, textaligncenter and noborder, which can be used as temporary overrides to a full style. |
['name']['font'] |
This identifies all the font attributes for this style. |
['name']['font']['family'] |
This identifies the font family. Allowable values are:
|
['name']['font']['style'] |
This is the font style. Possible values are:
|
['name']['font']['size'] |
This is the font size in points. |
['name']['font']['height'] |
This is the line height in the units identified in the page definition. Each piece of text will be printed in a cell, and this will be the height of each line in that cell. Line spacing within the cell is defined by creating a line height which is greater than the font size. If the line height is less than the minimum required by the font size it will be ignored. |
['name']['font']['draw'] |
The width, in millimeters, for any line drawing, such as the border around any cells. |
['name']['font']['align'] |
This is deprecated. Use halign instead. |
['name']['font']['halign'] |
This identifies the horizontal alignment of text within the cell. Possible values are:
|
['name']['font']['valign'] |
This identifies the vertical alignment of text within the cell. Possible values are:
|
['name']['font']['stretch']='y' |
(optional) This will cause the text to be stretched horizontally to fill the entire width of the cell. |
['name']['font']['border'] |
This identifies the border for each cell. Possible values are:
The border width is defined with the draw option, and the colour with the drawcolor option. In the List View the default is 'LR' (Left+Right). |
['name']['font']['image_border'] |
This identifies whether a border should be printed around an image or a barcode. Possible values are:
The border width is defined with the draw option, and the colour with the drawcolor option. |
['name']['font']['padding_?'] |
(where '?' is 'left', 'right', 'top' or 'bottom').
This defines any blank space between the edge of the cell (which may or may not have a border) and its contents. It is expressed in the units defined in the page definition. This is designed to be used for cells in the Label View |
['name']['font']['margin_?'] |
(where '?' is 'left', 'right', 'top' or 'bottom').
This defines any blank space between the edge of the cell (which may or may not have a border) and its surroundings. It is expressed in the units defined in the page definition. This is designed to be used for cells in the Label View |
['name']['fillcolour'] |
This colour will be used for the background, and is specified as a triplet of RGB colour values. If this is not defined the background will be transparent. |
['name']['textcolour'] |
This colour will be used for all text, and is specified as a triplet of RGB colour values. |
['name']['drawcolour'] |
This colour will be used for any line drawing, and is specified as a triplet of RGB colour values. |
['name']['ignore_if_empty'] |
(optional) This is designed to be used in the Detail View where each line contains a field value and its label. By default every line with this style will have its label printed even when the value is empty, but if this option is specified then if there is no value then both the field and its label will be ignored. |
['barcodeN']['type']
['barcodeN']['style']
['barcodeN']['xres']
['barcodeN']['fontsize'] |
This group defines the basic settings for the generation of barcodes. It is possible to have multiple choices by giving each group a unique name, usually by incrementing the value of the trailing 'N'.
For full details please refer to Barcode Generation. |
$font_replacement['language'] |
Optional. This identifies the replacement font when the specified language code is loaded into $GLOBALS['party_language']. For more details on the usage of this option please refer to Can I change the fonts in a PDF document at runtime? |
Note that it is possible to define a style with only a subset of attributes. This allows minor variations to be made to the current settings. Only ['font']['family'] and ['font']['style'] must be defined in pairs - all other attributes can be defined on their own.
This is similar to a screen structure file in that it allows the developer to specify a report's structure by identifying what needs to be printed where, then lets the framework process those instructions to produce the desired output. There is a different type of structure file for different views, although there are elements which are common to all views.
Sample scripts for each pattern can be found in the /radicore/default/reports/en/ directory with the name <pattern>.report.inc.
Scripts for each subsystem can be found in the /radicore/<subsystem>/reports/<language>/ directory. The default value for <language> is 'en' (English), but other language codes can be used - refer to Internationalisation and the Radicore Development Infrastructure for details.
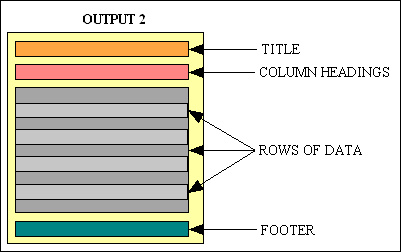
This is implemented using the OUTPUT2 transaction pattern. It will show the contents of one database object, one record per line. There will be column headings across the top of each page, plus an optional title and an optional footer, as shown in the following structure diagram:
Structure of List View
Sample List View
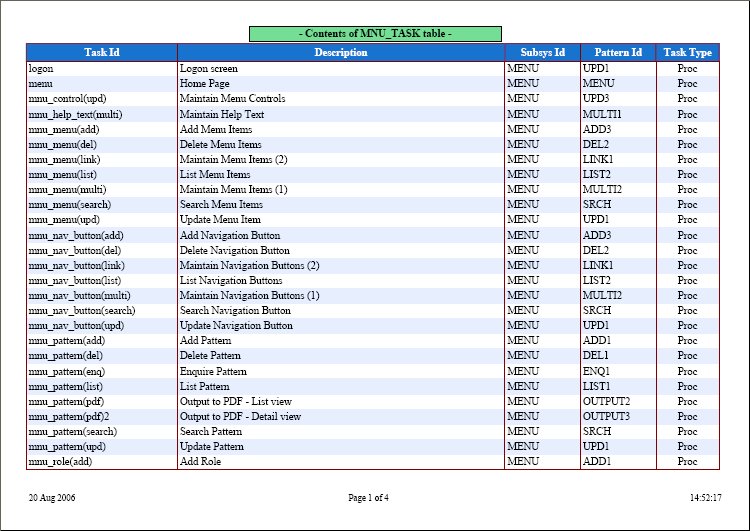
Here is the structure file which produced that view:
<?php
// report structure for a LIST view

// page definition  <--(1)
$structure['pdf'] = array('orientation' => 'L',     // L=Landscape, P=Portrait
                          'units' => 'mm',          // pt=Point, mm=Millimeter, cm=Centimeter, in=Inch
                          'format' => 'A4',         // A3, A4, A5, Letter, Legal
                          'name' => '',             // filename (if destination = D or F)
                          'destination' => 'I');    // I=Inline, D=Download, F=Filename, S=String

// zone styles  <--(2)
$structure['title']['style'] = 'title';             // style for page title
$structure['head']['style']  = 'hdg';               // style for column headings
$structure['body']['style']  = 'body';              // style for main body
$structure['foot']['style']  = 'foot';              // style for page footer

// define contents of page title  <--(3)
$structure['title'][] = array('text' => "- Contents of MNU_TASK table -",
                              'width' => 100,
                              'align' => 'center',
                              'border' => 'y');

// set column widths  <--(4)
$structure['columns'][] = array('width' => 60);
$structure['columns'][] = array('width' => 130);
$structure['columns'][] = array('width' => 30);
$structure['columns'][] = array('width' => 30);
$structure['columns'][] = array('width' => 25, 'halign' => 'center');

// identify column names and associated labels  <--(5)
$structure['body']['fields'][] = array('task_id' => 'Task Id');
$structure['body']['fields'][] = array('task_desc' => 'Description');
$structure['body']['fields'][] = array('subsys_id' => 'Subsys Id');
$structure['body']['fields'][] = array('pattern_id' => 'Pattern Id');
$structure['body']['fields'][] = array('task_type' => 'Task Type');

// define contents of page footer  <--(6)
$structure['foot1'][] = array('type' => 'date',   'align' => 'left', 'style' => 'textalignleft');
$structure['foot1'][] = array('type' => 'pageno', 'align' => 'center');
$structure['foot1'][] = array('type' => 'time',   'align' => 'right', 'style' => 'textalignright');

?>
This structure file contains the following elements:
Processing is performed in the following steps:
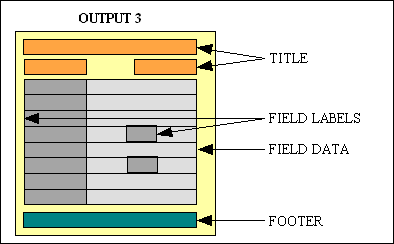
body style in the PDF style file this will be used on alternate rows. If you do not want the background of alternate rows to have a different colour then either set the fillcolour to white (255,255,255) or leave it unspecified, in which case the background will be transparent.body style in the PDF style file this will be used around each cell. The default is 'LR' (Left+Right), but this can be set to '1' (or 'LRTB') to include Top+Bottom as well. If the cell contains several lines of data no border will be shown between the lines. If it is set to 'P' then the border will be around the whole page instead of each cell.This is implemented using the OUTPUT3 transaction pattern. It will show the contents of one database object, one record per page. There will be column labels to the left and column data on the right. The default is one label plus associated field data to each line, but several fields and labels can be painted on the same line. There will also be an optional title and an optional footer, as shown in the following structure diagram:
Structure of Detail View
Sample Detail View
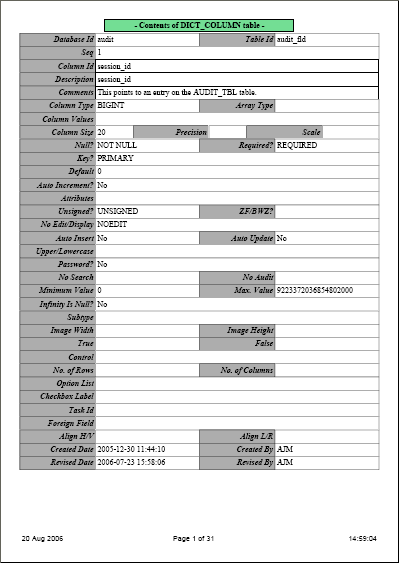
Here is part of the structure file which produced that view:
<?php
// report structure for a DETAIL view

// page definition  <--(1)
$structure['pdf'] = array('orientation' => 'P',     // L=Landscape, P=Portrait
                          'units' => 'mm',          // pt=Point, mm=Millimeter, cm=Centimeter, in=Inch
                          'format' => 'A4',         // A3, A4, A5, Letter, Legal
                          'name' => '',             // filename (if destination = D or F)
                          'destination' => 'I');    // I=Inline, D=Download, F=Filename, S=String

// zone styles  <--(2)
$structure['title']['style'] = 'title';             // style for page heading
$structure['label']['style'] = 'label';             // style for field labels
$structure['data']['style']  = 'data';              // style for field data
$structure['foot']['style']  = 'foot';              // style for page footer

// define contents of page title  <--(3)
$structure['title'][] = array('text' => "- Contents of DICT_COLUMN table -",
                              'width' => 100,
                              'align' => 'center',
                              'border' => 'y');

// set column widths  <--(4)
$structure['columns'][] = array('width' => 40, 'halign' => 'right');
$structure['columns'][] = array('width' => 150, 'halign' => 'left');

// identify labels and data to be output

// multiple fields per line <--(5)
$structure['body']['fields'][1][] = array('label' => 'Database Id', 'width' => 40);
$structure['body']['fields'][1][] = array('field' => 'database_id', 'width' => 55);
$structure['body']['fields'][1][] = array('label' => 'Table Id', 'width' => 40);
$structure['body']['fields'][1][] = array('field' => 'table_id', 'width' => 55);

// single field per line  <--(6)
$structure['body']['fields'][2] = array('column_seq' => 'Seq');
$structure['body']['fields'][3] = array('column_id' => 'Column Id');
$structure['body']['fields'][4] = array('column_desc' => 'Description');
$structure['body']['fields'][5] = array('comment' => 'Comments');

// lines 6-35 go here

// multiple fields per line <--(5)
$structure['body']['fields'][36][] = array('label' => 'Revised Date', 'width' => 40);
$structure['body']['fields'][36][] = array('field' => 'revised_date', 'width' => 55);
$structure['body']['fields'][36][] = array('label' => 'Revised By', 'width' => 40);
$structure['body']['fields'][36][] = array('field' => 'revised_user', 'width' => 55);

// define contents of page footer  <--(7)
$structure['foot1'][] = array('type' => 'date',   'align' => 'left', 'style' => 'textalignleft');
$structure['foot1'][] = array('type' => 'pageno', 'align' => 'center');
$structure['foot1'][] = array('type' => 'time',   'align' => 'right', 'style' => 'textalignright');

?>
This structure file contains the following elements:
There is also the option to append additional data from other database tables. Please refer to Body contents (detail view - additional data) for details.
Processing is performed in the following steps:
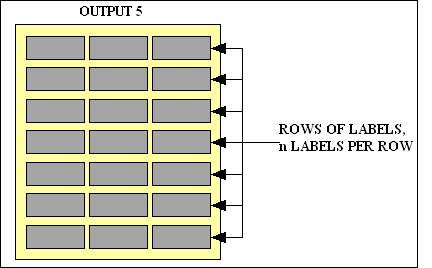
This is implemented using the OUTPUT5 transaction pattern. It will print rows of labels in a format suitable for commercial label stationery. The dimensions of each label and the number of labels per row are entirely configurable. The following structure diagram shows 7 rows with 3 labels per row, although other combinations can be configured:
Structure of Label View
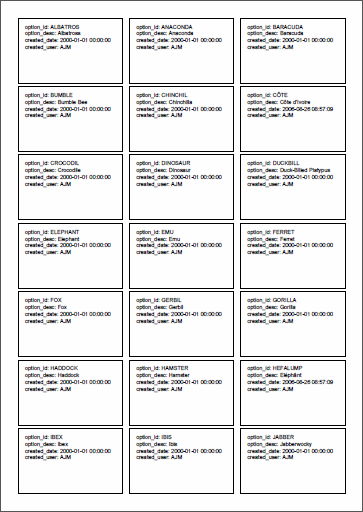
Sample label View
Here is the structure file which produced that view:
<?php
// report structure for the ADDRESS LABELS view

// report structure <--(1)
$structure['pdf'] = array('orientation' => 'P',     // L=Landscape, P=Portrait
                          'units' => 'mm',          // pt=Point, mm=Millimeter, cm=Centimeter, in=Inch
                          'format' => 'A4',         // A3, A4, A5, Letter, Legal
                          'name' => '',             // filename (if destination = D or F)
                          'destination' => 'I');    // I=Inline (browser), D=Download (browser), F=Filename (on server), S=String

$structure['pdf']['label_print'] = 3;               // defines the number of labels in each row <--(2)

$structure['data']['style']  = 'address_labels';    // style for label data <--(3)

// column widths <--(4)
$structure['columns'][] = array('width' => '33%');
$structure['columns'][] = array('width' => '0.5%');
$structure['columns'][] = array('width' => '33%');
$structure['columns'][] = array('width' => '0.5%');
$structure['columns'][] = array('width' => '33%');

// column names <--(5)
$structure['body']['fields'][1][] = array('field' => 'address1', 'min_lines' => 8);
$structure['body']['fields'][1][] = array('field' => '', 'style' => 'noborder');
$structure['body']['fields'][1][] = array('field' => 'address2', 'min_lines' => 8);
$structure['body']['fields'][1][] = array('field' => '', 'style' => 'noborder');
$structure['body']['fields'][1][] = array('field' => 'address3', 'min_lines' => 8);

?>
Here is an alternative method of describing the layout of columns which uses a margin instead of a blank column:
// column widths <--(4)
$structure['columns'][] = array('width' => '33%');
$structure['columns'][] = array('width' => '33%');
$structure['columns'][] = array('width' => '33%');

// column names <--(5)
$structure['body']['fields'][1][] = array('field' => 'address1', 'min_lines' => 8, 'margin_right' => 1);
$structure['body']['fields'][1][] = array('field' => 'address2', 'min_lines' => 8, 'margin_right' => 1);
$structure['body']['fields'][1][] = array('field' => 'address3', 'min_lines' => 8);
This structure file contains the following elements:
Processing is performed in the following steps:
Each file must contain the specifications for each of the relevant zones. The zones vary depending on the type of report being produced.
This defines the page size and orientation and is required in every structure file.
$structure['pdf'] = array('orientation' => 'L',     // L=Landscape, P=Portrait
                          'units' => 'mm',          // pt=Point, mm=Millimeter, cm=Centimeter, in=Inch
                          'format' => 'A4',         // A3, A4, A5, Letter, Legal
                          'margin_left' => 10,       // page left margin (default is 10 units)
                          'margin_right' => 10,      // page right margin (default is 10 units)
                          'margin_top' => 10,        // page top margin (default is 10 units)
                          'margin_bottom' => 10,     // page bottom margin (default is 20mm)
                          'name' => '',             // filename (if destination = D or F)
                          'destination' => 'I');    // I=Inline, D=Download, F=Filename, S=String
| Keyword | Values |
|---|---|
| destination | I=Inline (browser), D=Download (browser), F=Filename, S=String |
| format | A3, A4, A5, Letter, Legal |
| margin_left | This sets the size of the left margin for the whole page. The default is 10 units. |
| margin_right | This sets the size of the right margin for the whole page. The default is 10 units. |
| name | This is the file name to be used for the output, and is only valid if destination = D or F.
Valid formats for destination 'F' are either:
The valid format for destination 'D' is:
It is possible for this file name to be customised as it passes through the _cm_pre_output() method. |
| orientation | L=Landscape, P=Portrait |
| units | This will be the unit of measurement for all subsequent cell widths and line heights. Allowable values are:
pt=Point, mm=Millimeter, cm=Centimeter, in=Inch |
This defines the output style for each of the zones within the current report layout.
$structure['<zone>']['style'] = '<style_id>';
$structure['<zone>']['style'] = '<style_id>';
     .....     .....     .....     .....
| Keyword | Values |
|---|---|
| <zone> | Each type of report has a fixed set of zones, so only those names can be used. Anything else will be ignored.
|
| <style_id> | This is the name of one of the entries in the PDF style file. If the style is not found a default style will be used. |
The report title can have zero or more elements, and each element can be either and image (which includes a barcode) or a piece of text. The elements will be processed in the order in which they were defined, and unless absolute positioning is specified each element will follow the previous element on the same line. It is possible to specify a number of elements which will appear on different lines.
If the text within a cell is longer than the width of that cell, or it contains the newline character (\n), it will overflow onto the following line(s) by creating cells of the same width which will appear vertically below the first cell.
$structure['title']['body_gap'] = <body_gap>;

$structure['title'][] = array('image'        => '<imagename>',
                              'imagewidth'   => <imagewidth>,
                              'imageheight'  => <imageheight>,
                              'align'        => '<align>',
                              'border'       => '<border>',
                              'image_border' => '<image_border>',
                              'margin_left'  => <margin_left>,
                              'margin_right' => <margin_right>,
                              'newline'      => 'y',
                              'x'            => <x>,
                              'y'            => <y>,
                              'y_relative'   => <y_relative>);

$structure['title'][] = array('barcode'       => '<text>', or 'barcode' => '%%<text>',
                              'barcode_style' => '<barcode_style>',
                              'width'         => <width>,
                              'height'        => <height>,
                              'border'        => '<border>',
                              'image_border'  => '<image_border>',
                              'margin_left'   => <margin_left>,
                              'margin_right'  => <margin_right>,
                              'newline'       => 'y',
                              'x'             => <x>,
                              'y'             => <y>,
                              'y_relative'    => <y_relative>);

$structure['title'][] = array('text'    => '<text>', or 'text' => '%%<text>', or 'type' => '<type>',
                              'width'   => <width>,
                              'height'  => <height>,
                              'align'   => '<align>',
                              'halign'  => '<halign>',
                              'valign'  => '<valign>',
                              'border'  => '<border>',
                              'stretch' => 'y',
                              'nofill'  => 'y',
                              'style'   => '<style>',
                              'margin_left'   => <margin_left>,
                              'margin_right'  => <margin_right>,
                              'newline'       => 'y',
                              'x'             => <x>,
                              'y'             => <y>,
                              'y_relative'    => <y_relative>,
                              'y_save_top'    => '<posN>',
                              'y_save_bottom' => '<posN>',
                              'y'             => '<posN>',
                              'y'             => '<posN,posM>',
                              'ignore_if_empty' => 'y',
                              'print_only_once' => 'y');

$structure['title'][] = array( ... );
| Keyword | Values |
|---|---|
| <align> | (optional) This is absolute positioning. It will cause this cell to be printed in one of three places in the current line without any regard to other elements which may appear in the same line. Allowable values are:
halign and valign keywords, either in this area or the font definition in the PDF style file.
|
| <barcode_style> | Please refer to Barcode Generation. |
| <body_gap> | (optional) This identifies the gap between the title and the body of the report. It is expressed in the units defined in the page definition. The default value is 1mm. |
| <border> | (optional) This identifies the border which will be placed around the cell using the line width and colour of the current style, as defined in the PDF style file. Possible options are:
It is also possible to have combinations such as 'LR' (Left+Right) or 'TB' (Top+Bottom). |
| <halign> | (optional) This is the horizontal alignment of the text within the cell. This overrides the setting for the current style. Allowable values are:
|
| <height> | (optional) This is the height of the cell into which the text will be placed. It is expressed in the units defined in the page definition. The spacing between lines is defined by making the cell height greater than that required by the font size. |
| ignore_if_empty='y' | (optional) By default an empty text string would still be output as an empty cell, but if this option is present (regardless of its value) then this cell will not be added to the output, and any adjustments to the X/Y coordinates will be ingored.
This can be useful where an optional cell occupies an entire line on its own. Care should be taken when there are other cells in the same line as the absence of this cell may have unintended consequences. |
| <imagename> | The path to the image.
If <imagename> begins with '%%' it will be assumed to be a field name, so the data for that field will be extracted from the current data and used instead. For example, '%%foobar' will be replaced with the data for field 'foobar'. |
| <imagewidth> | The image width, in pixels. Required if <imagename> is supplied. |
| <imageheight> | The image height, in pixels. Required if <imagename> is supplied. |
| <image_border> | (optional) This identifies whether a border should be printed around an image or a barcode. Possible values are:
The border width is defined with the draw option, and the colour with the drawcolor option. |
| <margin_left> | (optional) This will define blank space which will appear to the left of this cell. It is expressed in the units defined in the page definition. |
| <margin_right> | (optional) This will define blank space which will appear to the right of this cell. It is expressed in the units defined in the page definition. |
| newline=y | (optional) This will cause a 'newline' to be issued after the current cell has been written out, thus forcing the next element to start at the beginning of the next line below the current cell. |
| nofill=y | (optional) This will cause this cell to be written without any background colour (i.e. transparent). This is useful when writing one cell over another when it is desired not to overwrite the bottom cell with the background colour of the top cell. |
| print_only_once='y' | (optional) This will cause this cell to be printed only once for database record. This means that if the details for a record flow over more than one page then this cell will only appear on the first page. |
| stretch='y' | (optional) This will cause the text to be stretched horizontally to fill the entire width of the cell. |
| <style> | (optional) This will override any style settings for the current zone with new settings, which will apply to this cell only. The default style for title is as defined in zone styles.
This cannot be used with |
| <text> %%<text> |
The text to be printed. If this contains newline characters (\n), or is greater than the cell width, then it will overflow onto the following lines. Any overflow cells will be the same width as the original, and will appear vertically below the original. Any border will be drawn around the group of cells and not around individual cells in the group.
Newline characters are not allowed in barcodes. If <text> begins with '%%' it will be assumed to be a field name, so the data for that field will be extracted from the current data and used instead. For example, '%%foobar' will be replaced with the data for field 'foobar'. |
| <type> | This is an alternative to 'text'.
|
| <valign> | (optional) This is the vertical alignment of the text within the cell. Allowable values are:
|
| <width> | This is the width of the cell into which the text will be placed. It can be expressed as one of the following:
|
| <x> | (optional) This is absolute positioning. It identifies the X axis (along the horizontal plane) for the top left hand corner of the current cell. It is expressed in the units defined in the page definition, and will be relative to the page's left margin. |
| <y> | (optional) This is absolute positioning. It identifies the Y axis (along the vertical plane) for the top left hand corner of the current cell. It is expressed in the units defined in the page definition, and will be relative to the page's top margin. Note that instead of a number you may supply a 'posN' string (see below) to identify a value that was saved in a previous cell. |
| <y_relative> | (optional) Unlike <y> which supplies an absolute position on the current page this supplies a position which is relative to the bottom of the previous cell. A value of '1' would therefore create a space of 1 unit between the bottom of the previous cell and the top of this cell. Negative values are also allowed. Note that this attribute can also be used with 'y' => 'posN' to add an adjustment to that absolute position. |
Click here to see some sample output.
The following attributes can be used to save the 'y' position in one cell so that it can be used in another cell:
| Keyword | Values |
|---|---|
| 'y_save_top' => 'posN' | This saves the top 'y' co-ordinate of this cell with the name 'posN', where 'N' is a number in the range 0-9. |
| 'y_save_bottom' => 'posN' | This saves the bottom 'y' co-ordinate of this cell with the name 'posN', where 'N' is a number in the range 0-9. |
| 'y' => 'posN' | This sets the 'y' co-ordinate of this cell to the value stored in 'posN'. |
| 'y' => 'posN,posM' | This sets the 'y' co-ordinate of this cell to the largest value stored in either 'posN' or 'posM'. Any number of 'pos' values may be referenced in this comma-separated list. |
Here is an example which shows how that can be used:
Usage of 'pos' attributes
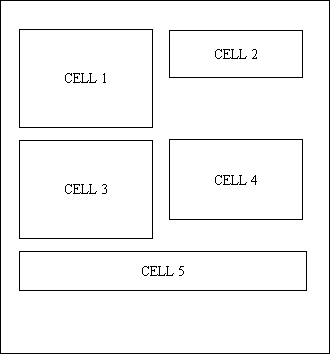
In this example cells 1, 3 and 4 have an indeterminate depth due to the fact that they contain one or more fields which wrap onto multiple lines, either because the text is longer than the cell's width, or because it contains several newline characters.
Problem #1: If cell2 is created after cell1 it means that the 'y' coordinate would be set to the bottom of cell2, which would mean that cell3 would start in the wrong position.
Solution #1:
'y_save_bottom' => 'pos1'
This will save the bottom coordinate of cell1 in a variable called 'pos1'.
'y' => 'pos1'
This will set the top coordinate of cell3 to the value stored in 'pos1'.
Problem #2: Because both cell3 and cell4 have indeterminate sizes it would not be practical to guess which one was the deeper so that so that cell5 can start at that coordinate.
Solution #2:
'y_save_bottom' => 'pos3'Include the following in the attributes for cell4:
'y_save_bottom' => 'pos4'
This will save the bottom coordinates of those cells in separate variables.
'y' => 'pos3,pos4'
This will set the top coordinate of cell5 to the highest value of those stored in 'pos3' and 'pos4'. Note that this list can contain any number of variable names separated by a comma.
This is used in List view to identify the number of columns to be printed, the width of each of those columns, and optionally the alignment of the text in those columns and padding around the text. The data which it acts upon is defined in Body contents (list view).
$structure['columns'][] = array('width' => <width>);
$structure['columns'][] = array('width' => <width>, 'overflow' => 'y');
     .....    .....     .....     .....     .....
$structure['columns'][] = array('width' => <width>, 'halign' => '<halign>');
$structure['columns'][] = array('width' => <width>, 'padding_top'    => '<padding>',
                                                    'padding_bottom' => '<padding>',
                                                    'padding_left'   => '<padding>',
                                                    'padding_right'  => '<padding>');
| Keyword | Values |
|---|---|
| <align> | This is deprecated. Use halign instead. |
| <halign> | (optional) This aligns the text horizontally for all data cells within this column in the report body. Allowable options are:
head style in the PDF style file.
|
| overflow=y | (optional) By default any text in the report body which cannot fit into a single line will be truncated. If this keyword is present then the text will be allowed to overflow onto as many lines as necessary.
Any label text in the column headings will always be allowed to overflow. |
| <padding> | This identifies the padding value which is expressed in the units defined in the page definition.
Note that 'padding_left' and 'padding_right' are set to '1' by default, but can be changed for individual cells. Note that if 'padding_top' and/or 'padding_bottom' are defined for any cell in a row these values will be applied to every cell in that row. If different cells have different values then the highest values will be used. This is because every cell in a row must have the same height, and different padding values would produce inconsistent results. |
| <width> | This applies to both the column headings and the column data in the report body. It is the width of the cell into which the text will be placed. It can be expressed as one of the following:
|
Click here to see some sample output.
This is used in List view to identify which fields from the current record in the database object are to be inserted into the report, and in which order. The field values for each record will appear in lines across the page, one below the other, while the field values will appear in a single line across the top of the page with each field label above the data to which it is related.
$structure['body']['fields'][] = array('<fieldname>' => '<labeltext>');
$structure['body']['fields'][] = array('<fieldname>' => '<labeltext>');
     .....    .....     .....     .....     .....     .....     .....
$structure['body']['fields'][] = array('<fieldname>' => '<labeltext>');
| Keyword | Values |
|---|---|
| <fieldname> | This data for this field will be extracted from $this->fieldarray which is the data from the current occurrence inside the database object being used by the reporting task. This will be displayed in the report body.
Please visit here for additional information on how the data may be altered before it is displayed. |
| <labeltext> | This is the label for this piece of data, which will be displayed in the column heading at the top of the page. Different translations of this label can be provided in different languages by using Radicore's Internationalisation feature. |
Click here to see some sample output.
This is used in Detail view to define the column width and text alignment for Body contents (detail view - single). Only two entries are allowed - the first is for the labels while the second is for the data.
$structure['columns'][] = array('width' => <width>, 'halign' => '<halign>');  <-- 1st entry for labels
$structure['columns'][] = array('width' => <width>, 'halign' => '<halign>');  <-- 2nd entry for data
$structure['columns'][] = array('width' => <width>, 'padding_top'    => '<padding>',  <-- 2nd entry with optional padding
                                                    'padding_bottom' => '<padding>',
                                                    'padding_left'   => '<padding>',
                                                    'padding_right'  => '<padding>');
| Keyword | Values |
|---|---|
| <align> | This is deprecated. Use halign instead. |
| <halign> | (optional) This aligns the text horizontally within each of these data cells. Allowable options are:
|
| <width> | This is the width of the cell into which the text will be placed. It can be expressed as one of the following:
|
| <padding> | This identifies the padding value which is expressed in the units defined in the page definition.
Note that 'padding_left' and 'padding_right' are set to '1' by default, but can be changed for individual cells. Note that any padding options set here will be applied to all data columns. |
Click here to see some sample output.
This is used in Detail view to create a line in the report containing the specified field and its associated label, with the label on the left and the data on the right. The column widths and text alignment are a specified in Column specs (detail view).
This is a "per line" specification, so it is possible to mix multi-field and single-field lines in the same report.
$structure['body']['fields'][<lineno>] = array('<fieldname>' => '<labeltext>');
$structure['body']['fields'][<lineno>] = array('<fieldname>' => '<labeltext>');
     .....    .....     .....     .....     .....     .....     .....
$structure['body']['fields'][<lineno>] = array('<fieldname>' => '<labeltext>', 'notext' => 'y');
$structure['body']['fields'][<lineno>] = array('<fieldname>' => '<labeltext>', 'padding_top'    => 2,
                                                                               'padding_bottom' => 2,
                                                                               'padding_left'   => 2,
                                                                               'padding_right'  => 2);
| Keyword | Values |
|---|---|
| <fieldname> | This data for this field will be extracted from $this->fieldarray which is the data from the current occurrence inside the database object being used by the reporting task.
The way that the data is displayed may be affected by settings with the $this->fieldspec array, as follows:
Is this behaviour is not required the solution is to remove the triggering entry from the $this->fieldspec array by inserting code into the _cm_pre_output() method inside the table class. |
| <labeltext> | This is the label for this piece of data. Different translations of this label can be provided in different languages by using Radicore's Internationalisation feature. |
| <lineno> | (optional) This should normally be left blank so that PHP can automatically assign the next available number. However, when combined with Body contents (detail view - multiple) in the same report it may be a good idea to provide explicit line numbers. Line numbers must be sequential but need not be consecutive. |
| 'notext' => 'y' | If the field is an image then this can be used to omit the filename from the output. |
| <padding> | This identifies the padding value which is expressed in the units defined in the page definition.
Note that 'padding_left' and 'padding_right' are set to '1' by default, but can be changed for individual cells. |
Click here to see some sample output.
This is used in Detail view to create a line in the report containing multiple fields and/or labels. This is a "per line" specification, so it is possible to mix multi-field and single-field lines in the same report.
It is also possible to specify a line which consists of nothing but labels, or a line which consists of nothing but data. Because each cell in the line is specified individually any combination is possible. Note that each cell must be either a label or a field (which includes a barcode), but not both.
$structure['body']['fields'][<lineno>][] = array('label'  => '<labeltext>',
                                                 'halign' => '<halign>',
                                                 'style'  => '<style>',
                                                 'width'  => <width>);

$structure['body']['fields'][<lineno>][] = array('field'  => '<fieldname>',
                                                 'halign' => '<halign>',
                                                 'style'  => '<style>',
                                                 'width'  => <width>,
                                                 'notext' => 'y',
                                                 'y_minimum'  => <y_minimum>,
                                                 'y_relative' => <y_relative>,
                                                 'y'          => <y>,
                                                 'padding_top'    => <padding>,
                                                 'padding_bottom' => <padding>,
                                                 'padding_left'   => <padding>,
                                                 'padding_right'  => <padding>);

$structure['body']['fields'][<lineno>][] = array('barcode'       => '<fieldname>',
                                                 'barcode_style' => '<barcode_style>',
                                                 'width'         => <width>,
                                                 'height'        => <height>);
     .....    .....     .....     .....     .....     .....     .....
$structure['body']['fields'][<lineno>][] = array('label' => '<labeltext>',
                                                 .......     .......
                                                 'width' => <width>);
$structure['body']['fields'][<lineno>][] = array('field' => '<fieldname>',
                                                 .......     .......
                                                 'width' => <width>);

$structure['body']['fields'][<lineno>][] = array('image' => '<imagename>',
                                                 'imageheight'  => <imageheight>,
                                                 'imagewidth'   => <magewidth>,
                                                 'align'        => '<align>',
                                                 'border'       => '<border>',
                                                 'image_border' => '<image_border>',
                                                 'margin_left'  => <margin_left>,
                                                 'margin_right' => <margin_right>,
                                                 'style'        => '<style>',
                                                 'width'        => <width>);
| Keyword | Values |
|---|---|
| <align> | This is deprecated. Use halign instead. |
| <halign> | (optional) This aligns the text horizontally within this data cell. Allowable options are:
|
| <barcode_style> | Please refer to Barcode Generation. |
| <fieldname> | This data for this field will be extracted from $this->fieldarray which is the data from the current occurrence inside the database object being used by the reporting task. Note that each cell must be either a label or a field (which includes a barcode), but not both.
Please visit here for additional information on how the data may be altered before it is displayed. |
| <height> | (optional) This is expressed in the units defined in the page definition. If specified it will override the height of the current font. |
| <imagename> | The path to the image.
If <imagename> begins with '%%' it will be assumed to be a field name, so the data for that field will be extracted from the current data and used instead. For example, '%%foobar' will be replaced with the data for field 'foobar'. |
| <imagewidth> | The image width, in pixels. Required if <imagename> is supplied. |
| <imageheight> | The image height, in pixels. Required if <imagename> is supplied. |
| <image_border> | (optional) This identifies whether a border should be printed around an image or a barcode. Possible values are:
The border width is defined with the draw option, and the colour with the drawcolor option. |
| <labeltext> | This is the label for this piece of data. Different translations of this label can be provided in different languages by using Radicore's Internationalisation feature. Note that each cell must be either a label or a field, but not both. |
| <lineno> | All fields which are to appear on the same line in the report must have the same line number. Line numbers must be sequential but need not be consecutive. |
| 'notext' => 'y' | If the field is an image then this can be used to omit the filename from the output. |
| <style> | (optional) This will override any style settings for the current zone with new settings, which will apply to this cell only. The default style for label and data is as defined in zone styles.
This cannot be used with |
| <width> | This is the width of the cell into which the text will be placed. It can be expressed as one of the following:
|
| <y> | (optional) This is absolute positioning. It identifies the Y axis (along the vertical plane) for the top left hand corner of the current cell. It is expressed in the units defined in the page definition, and will be relative to the page's top margin. This should only be used on the first cell in a line. |
| <y_minimum> | (optional) If the current value for the Y axis is greater than this value then a new page will be started before this cell is printed. This ensures that there is enough room on the current page for this line (or group of lines). This should only be used on the first cell in a line. |
| <y_relative> | (optional) Unlike <y> which supplies an absolute position on the current page this supplies a position which is relative to the bottom of the previous cell. A value of '1' would therefore create a space of 1 unit between the bottom of the previous cell and the top of this cell. This should only be used on the first cell in a line. |
| <padding> | This identifies the padding value which is expressed in the units defined in the page definition.
Note that 'padding_left' and 'padding_right' are set to '1' by default, but can be changed for individual cells. Note that if 'padding_top' and/or 'padding_bottom' are defined for any cell in a row these values will be applied to every cell in that row. If different cells have different values then the highest values will be used. This is because every cell in a row must have the same height, and different padding values would produce inconsistent results. |
Click here to see some sample output.
By default each page is constructed from the data which is found in one row in the object's internal fieldarray, which will be referred to as the parent row. Although each row may contain data from several sources there may sometimes be a need to append several rows of data from several related database tables. These will usually be children of the current parent.
This can be achieved by specifying different data zones which are to be appended to each page of the report following on from the normal data area. These zones have the following characteristics:
'multiN' where 'N' is in the range 1-99. Each of these zones can therefore be used to read from a different related table.Note that by default each row from the parent table will start printing on a fresh page, and the additional zones will be processed just once for that row where each zone can produce multiple rows. If the multi1 zone is for a child table and the multi2 zone is for a grandchild table this will produce out that follows this structure:
parent
 |
child
child
...
grandchild
grandchild
...
In this example the _cm_output_multi() method will be called just once for each of the different multi* zones in the screen structure file.
However, it may be required to group rows from a grandchild table below each row from a child table, thus producing the following structure:
parent
 |
child#1
 - grandchild
 - grandchild
 - ...
child#2
 - grandchild
 - grandchild
 - ...
This can be implemented by using the _cm_output_Iterations() method to read all rows from the child table, extract their primary keys and add each one to the $iterations array. This will cause the _cm_output_Multi() method to be called multiple times where the value in $iteration will be the next primary key from the $iterations array created earlier. This method should then be adjusted to start by reading one entry from the child table using the single primary key in the $iteration parameter so that it can subsequently read any available entries from a grandchild table.
The optional additional data zones can be included in a report's structure file using code similar to the following:
// identify output for 1st additional zone
$structure['multi1']['fields'][1][] = array('label'  => '<labeltext>',  <-- line # 1 in this zone
                                            'halign' => '<halign>',
                                            'style'  => '<style>',
                                            'width'  => <width>,
                                            'height' => <height>,
                                            'notext' => 'y',
                                            'border' => <border>,
                                            'fill_alternate'  => 'y',
                                            'margin_left'     => '<margin_left>',
                                            'margin_right'    => '<margin_right>',
                                            'x'               => '<x>',
                                            'y_minimum'       => '<y_minimum>',
                                            'y_relative'      => '<y_relative>',
                                            'y'               => '<y>',
                                            'padding_top'     => <padding>,
                                            'padding_bottom'  => <padding>,
                                            'padding_left'    => <padding>,
                                            'padding_right'   => <padding>
                                            'ignore_if_empty' => 'y');

$structure['multi1']['fields'][1][] = array('field' => '<fieldname>',
                                            ......     ......
                                            'y'           => '<y>');

$structure['multi1']['fields'][1][] = array('barcode'       => '<text>', or 'barcode' => '%%<text>',
                                            'barcode_style' => '<barcode_style>',
                                            'width'         => <width>,
                                            'height'        => <height>,
                                            ......     ......
                                            'y'           => '<y>');

// identify output for 2nd additional zone
$structure['multi2']['fields'][1][] = array('label' => '<labeltext>',  <-- line # 1 in this zone
                                            ......     ......
                                            'y'           => '<y>');
$structure['multi2']['fields'][1][] = array('field' => '<fieldname>',
                                            ......     ......
                                            'y'           => '<y>');
$structure['multi2']['fields'][2][] = array('label' => '<labeltext>',  <-- line # 2 in this zone
                                            ......     ......
                                            'y'           => '<y>');
$structure['multi2']['fields'][2][] = array('field' => '<fieldname>',
                                            ......     ......
                                            'y'           => '<y>');

// identify output for 3rd additional zone
$structure['<zone>']['fields'][<lineno>][] = array( ... );  <-- line # 1 in this zone
| Keyword | Values |
|---|---|
| <align> | This is deprecated. Use halign instead. |
| <barcode_style> | Please refer to Barcode Generation. |
| <border> | This will allow the border setting in the current style to be overridden, either to add or remove a border for the current cell. Possible options are:
It is also possible to have combinations such as 'LR' (Left+Right) or 'TB' (Top+Bottom). |
| <fieldname> | This data for this field will be extracted from the fieldarray which was generated for this zone by the database object. |
| fill_alternate='y' | (optional) If the style for this zone has a value for fillcolour then this will cause that colour to be toggled ON or OFF for alternate rows.
Click here to see some sample output. |
| <halign> | (optional) This aligns the text horizontally within this data cell. Allowable options are:
|
| <height> | (optional) This is the height of the cell into which the text will be placed. It is expressed in the units defined in the page definition. The spacing between lines is defined by making the cell height greater than the font size. |
| ignore_if_empty='y' | (optional) By default an empty text string would still be output as an empty cell, but if this option is present (regardless of its value) then this cell will not be added to the output, and any adjustments to the X/Y coordinates will be ingored. Other non-empty cells in the line will still be printed, so any following cells may be out of position. |
| <labeltext> | This is the label for this piece of data. Different translations of this label can be provided in different languages by using Radicore's Internationalisation feature. |
| <lineno> | All fields which are to appear on the same line must have the same line number. Line numbers must be sequential but need not be consecutive. |
| <margin_left> | (optional) This will define blank space which will appear to the left of this cell. It is expressed in the units defined in the page definition. |
| <margin_right> | (optional) This will define blank space which will appear to the right of this cell. It is expressed in the units defined in the page definition. |
| 'notext' => 'y' | If the field is an image then this can be used to omit the filename from the output. |
| <padding> | This identifies the padding value which is expressed in the units defined in the page definition.
Note that 'padding_left' and 'padding_right' are set to '1' by default, but can be changed for individual cells. Note that if 'padding_top' and/or 'padding_bottom' are defined for any cell in a row these values will be applied to every cell in that row. If different cells have different values then the highest values will be used. This is because every cell in a row must have the same height, and different padding values would produce inconsistent results. |
| <style> | (optional) This will override any style settings for the current zone with new settings, which will apply to this cell only. The default style for label and data is as defined in zone styles.
This cannot be used with |
| <text> %%<text> |
The text to be printed. If this contains newline characters (\n), or is greater than the cell width, then it will overflow onto the following lines. Any overflow cells will be the same width as the original, and will appear vertically below the original. Any border will be drawn around the group of cells and not around individual cells in the group.
Newline characters are not allowed in barcodes. If <text> begins with '%%' it will be assumed to be a field name, so the data for that field will be extracted from the current data and used instead. For example, '%%foobar' will be replaced with the data for field 'foobar'. |
| <width> | (optional) This is the width of the cell into which the text will be placed. It can be expressed as one of the following:
|
| <x> | (optional) This is absolute positioning. It identifies the X axis (along the horizontal plane) for the top left hand corner of the current cell. It is expressed in the units defined in the page definition, and will be relative to the page's left margin. |
| <y> | (optional) This is absolute positioning. It identifies the Y axis (along the vertical plane) for the top left hand corner of the current cell. It is expressed in the units defined in the page definition, and will be relative to the page's top margin. This should only be used on the first cell in a line. |
| <y_minimum> | (optional) If the current value for the Y axis is greater than this value then a new page will be started before this cell is printed. This ensures that there is enough room on the current page for this line (or group of lines). This should only be used on the first cell in a line. |
| <y_relative> | (optional) Unlike <y> which supplies an absolute position on the current page this supplies a position which is relative to the bottom of the previous cell. A value of '1' would therefore create a space of 1 unit between the bottom of the previous cell and the top of this cell. This should only be used on the first cell in a line. |
| <zone> | The name of the zone in the format 'multiN' where 'N' is in the range 1-99. |
Click here to see some sample output.
This provides an optional footer at the bottom of each page. It can span either one or two lines, and each line can have one or more elements.
$structure['<id>'][] = array('type' => '<type>',
                             'align'  => '<align>',
                             'halign' => '<halign>',
                             'valign' => '<valign>',
                             'border' => '<border>',
                             'height' => <height>,
                             'width'  => <width>,
                             'stretch'      => 'y',
                             'margin_left'  => <margin_left>,
                             'margin_right' => <margin_right>,
                             'style'        => '<style>',
                             'x'            => <x>);

$structure['<id>'][] = array('text' => '<text>', or 'text' => '%%<text>',
                             'align'  => '<align>',
                             'halign' => '<halign>',
                             'valign' => '<valign>',
                             'border' => '<border>',
                             'height' => <height>,
                             'width'  => <width>,
                             'stretch'      => 'y',
                             'margin_left'  => <margin_left>,
                             'margin_right' => <margin_right>,
                             'style'        => '<style>',
                             'x'            => <x>);

$structure['<id>'][] = array('image' => '<imagename>',
                             'imageheight'  => <imageheight>,
                             'imagewidth'   => <magewidth>,
                             'align'        => '<align>',
                             'border'       => '<border>',
                             'image_border' => '<image_border>',
                             'margin_left'  => <margin_left>,
                             'margin_right' => <margin_right>,
                             'style'        => '<style>',
                             'x'            => <x>);

$structure['<id>'][] = array( ... );
| Keyword | Values |
|---|---|
| <align> | (optional) This is absolute positioning. It will cause this cell to be printed in one of three places in the current line without any regard to other elements which may appear in the same line. Allowable values are:
halign and valign keywords, either in this area or the font definition in the PDF style file.
|
| <border> | (optional) This identifies the border which will be placed around the cell using the line width and colour of the current style, as defined in the PDF style file. Possible options are:
It is also possible to have combinations such as 'LR' (Left+Right) or 'TB' (Top+Bottom). |
| <halign> | This identifies the horizontal alignment of text within the cell. Possible values are:
|
| <height> | (optional) This is the height of the cell into which the text will be placed. It is expressed in the units defined in the page definition. The spacing between lines is defined by making the cell height greater than the font size. |
| <id> | Up to two lines are allowed in the footer, identified as foot1 and foot2. |
| <imagename> | The path to the image.
If <imagename> begins with '%%' it will be assumed to be a field name, so the data for that field will be extracted from the current data and used instead. For example, '%%foobar' will be replaced with the data for field 'foobar'. |
| <imagewidth> | The image width, in pixels. Required if <imagename> is supplied. |
| <imageheight> | The image height, in pixels. Required if <imagename> is supplied. |
| <image_border> | (optional) This identifies whether a border should be printed around an image or a barcode. Possible values are:
The border width is defined with the draw option, and the colour with the drawcolor option. |
| <margin_left> | (optional) This will define blank space which will appear to the left of this cell. It is expressed in the units defined in the page definition. |
| <margin_right> | (optional) This will define blank space which will appear to the right of this cell. It is expressed in the units defined in the page definition. |
| stretch='y' | (optional) If this is present it will cause the text to be stretched horizontally to fill the entire width of the cell. |
| <style> | (optional) This will override any style settings for the current zone with new settings, which will apply to this cell only. The default style for foot is as defined in zone styles. |
| <text> %%<text> |
The text to be printed. It cannot span more than one line, so should not exceed the specified width or contain the newline character (\n).
If <text> begins with '%%' it will be assumed to be a field name, so the data for that field will be extracted from the current data and used instead. For example, '%%foobar' will be replaced with the data for field 'foobar'. |
| <type> | This is an alternative to 'text'.
|
| <valign> | This identifies the vertical alignment of text within the cell. Possible values are:
|
| <width> | (optional) This is the width of the cell into which the text will be placed. It can be expressed as one of the following:
|
| <x> | (optional) This is absolute positioning. It identifies the X axis (along the horizontal plane) for the top left hand corner of the current cell. It is expressed in the units defined in the page definition, and will be relative to the page's left margin. |
Click here to see some sample output.
This is used in Label view to identify the number of columns to be printed and the width of each of those columns. The data which it acts upon is defined in Column names (label view).
$structure['columns'][] = array('width' => <width>);
| Keyword | Values |
|---|---|
| <width> | This is the width of the cell into which the column data will be placed. It can be expressed as one of the following:
|
Click here to see some sample output.
This is used in Label view to identify how many labels are to be printed in each row.
$structure['body']['fields'][1][] = array('field'       => '<field>',
                                          'min_lines'    => <min_lines>,
                                          'margin_right' => <margin_right>);
$structure['body']['fields'][1][] = array('field' => '', 'style' => 'noborder');
| Keyword | Values |
|---|---|
| <field> | The name of the field which provides the contents of each label. Each name should have a suffix which starts at 1 and which increments by 1, such as address1, address2, address3 or label1, label2, label3, et cetera. There needs to be as many of these fields as the value defined in the report structure file.
A blank name is used to signify an empty column which is used as a separator between labels. This is an alternative to using the margin_right option. |
| <min_lines> | This identifies the minimum number of lines that the cell should contain. If there are fewer then the cell will be padded out with blank lines. |
| <margin_right> | This is the width of the cell into which the column data will be placed. It can be expressed as one of the following:
|
| style=noborder | If the font definition used for the labels includes a border, this is used to turn off the border on the empty columns. |
Click here to see some sample output.
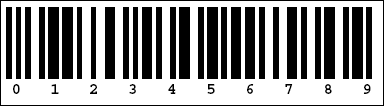
The creation of barcodes in the TCPDF library uses a modified version of "Generic Barcode Render Class" by Karim Mribti (http://www.mribti.com/barcode/). In order to utilise this class within the Radicore framework there must be settings in the global PDF style file and the individual Report Structure File, as shown in the following:
You may define one or more barcode styles with the following settings in your PDF style file:
// barcode styles
$style['barcode1']['drawcolour'] = array(0,0,0);       // border colour
$style['barcode1']['draw'] = .2;                       // border width
$style['barcode1']['type'] = 'I25';         // I25, C128A, C128B, C128C, C39,
                                            // C39+, C39E, C39E+, EAN13, UPCA, POSTNET, CODABAR
$style['barcode1']['style'] = 'CDS';        // B=Border, D=Draw Text, S=Stretch Text, N=Negative,
                                            // L=Align Left, C=Align Center, R=Align Right, X=Stretch Image
$style['barcode1']['xres'] = 2;             // 1,2,3
$style['barcode1']['fontsize'] = 5;         // 1,2,3,4,5
['barcodeN']['type'] |
This identifies the barcode type. Possible values for 1D codes are:
Possible values for 2D codes are:
|
['barcodeN']['style'] |
This identifies the barcode style by combining any of the following characters:
The following will align the image within the cell (the printable area):
The default setting is 'C' (a black on white image aligned in the centre of the cell). |
['barcodeN']['xres'] |
This identifies the size/resolution of the barcode image. Possible values are:
|
['barcodeN']['fontsize'] |
This identifies the size of the optional text. Possible values are:
|
If you want more options than are available with the single ['barcodeN']['style'] setting you can replace it with any combination of the following:
['barcodeN']['type'] |
(as above) |
['barcodeN']['fgcolor'] |
Foreground colour, specified as a triplet of RGB colour values. |
['barcodeN']['bgcolor'] |
Background colour, specified as a triplet of RGB colour values, or false for transparent. |
['barcodeN']['border'] |
This identifies the border for the cell which contains the barcode image. Possible values are:
|
['barcodeN']['image_border'] |
If set to true this will print a border around the barcode. |
['barcodeN']['image_offset'] |
By default the top left corner of the image will appear in the top left corner of its containing cell. An offset can be specified in user units which will cause the image to shift down and to the right. |
['barcodeN']['align'] |
Horizontal position of the barcode on the containing rectangle. Possible options are:
|
['barcodeN']['cellfitalign'] |
Position of the barcode image within the enclosing cell. Possible options are:
|
['barcodeN']['font'] |
The font to be used for the text (default is courier). |
['barcodeN']['fontsize'] |
The font size (in points) to be used for the text (default is 8pt). |
['barcodeN']['padding'] |
Padding to leave around the barcode in user units (default is 1). |
['barcodeN']['hpadding'] |
Horizontal padding in user units (set to 'auto' for automatic padding). |
['barcodeN']['vpadding'] |
Vertical padding in user units (set to 'auto' for automatic padding). |
['barcodeN']['stretch'] |
If true stretch the barcode to best fit the available width, otherwise uses $xres resolution for a single bar. |
['barcodeN']['stretchtext'] |
Must be one of the following:
|
['barcodeN']['text'] |
If set to true this will print text below the barcode image. |
The following options apply to 2D barcodes:
['barcodeN']['module_width'] |
Width of a single module in points. |
['barcodeN']['module_height'] |
Height of a single module in points. |
['barcodeN']['distort'] |
If true distort the barcode to fit width and height, otherwise preserve aspect ratio. |
You define the size and position of each barcode in your output with one of the following settings in your Report Structure File.
Note that in all the following samples these values are required:
barcode keyword identifies that the value is to be rendered as a barcodebarcode_style determines what sort of image will be generatedwidth and height determine the size of the generated imageThis is entry is available in Body contents (detail view - multiple):
$structure['body']['fields'][<lineno>][] = array('barcode'       => '<fieldname>',
                                                 'barcode_style' => '<barcode_style>',
                                                 'width'         => <width>,
                                                 'height'        => <height>);
This is entry is available in Title Contents:
$structure['title'][] = array('barcode'       => '<text>', or 'barcode' => '%%<text>',
                              'barcode_style' => '<barcode_style>',
                              'width'         => <width>,
                              'height'        => <height>);
This is entry is available in Body contents (detail view - additional data):
$structure['multi1']['fields'][1][] = array('barcode'       => '<text>', or 'barcode' => '%%<text>',
                                            'barcode_style' => '<barcode_style>',
                                            'width'         => <width>,
                                            'height'        => <height>);
Here is some sample barcode output. Note that the border around each image is the cell border (produced with 'border' => 'y') and not the image border (produced with 'style' => 'B'). The image which is produced will always be slightly smaller than the cell in which it is contained so that if both have a border you will see two sets of lines with a slight gap between them.
Centre aligned, with stretched text ('style' => 'CDS')

Centre aligned, without text ('style' => 'C')

Left aligned ('style' => 'L')

Right aligned ('style' => 'R')

Centered, with border ('style' => 'CB')

Negative, centered, with stretched text ('style' => 'CDSN')

Stretched image with stretched text ('style' => 'DSX')
Sample PDF output which includes barcodes is available in the Prototype EXAMPLE application on the 'List Person' screen, specifically on the 'Output to PDF (D)' and 'Invoice (PDF)' buttons.
Here are some examples of the output which can be produced, and the code necessary to produce it.
Here is a sample Title that can appear at the top of every page.
Example Title

The above sample title was produced with the following code in the report structure file:
$structure['title'][] = array('text' => '<- first element ->',
                              'width' => 100,
                              'align' => 'center',
                              'border' => 'y',
                              'newline' => 'y');
$structure['title'][] = array('text' => '<- second element',
                              'width' => 40,
                              'align' => 'left',
                              'border' => 'y');
$structure['title'][] = array('text' => 'third element ->',
                              'width' => 40,
                              'align' => 'right',
                              'border' => 'y',
                              'newline' => 'y');
If any text element contains a name prefixed with '%%' it will cause the contents of the field with that name to be extracted from the current record data and inserted into the title. Please see _cm_ListView_header() for details.
Here is a sample List view that shows multiple database rows per page, with one row on each line and topped off by a row containing column headings.
Example List view
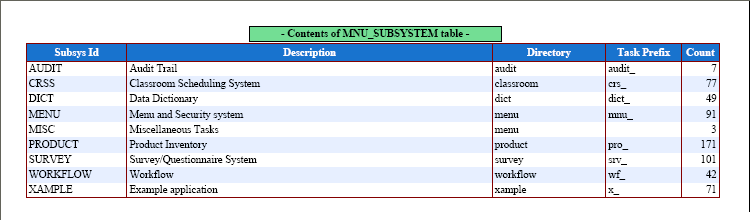
The above sample List view was produced with the following code in the report structure file:
// set column widths
$structure['columns'][] = array('width' => 42);
$structure['columns'][] = array('width' => 145);
$structure['columns'][] = array('width' => 45);
$structure['columns'][] = array('width' => 30);
$structure['columns'][] = array('width' => 15, 'halign' => 'right');

// identify column names and associated labels
$structure['body']['fields'][] = array('subsys_id' => 'Subsys Id');
$structure['body']['fields'][] = array('subsys_desc' => 'Description');
$structure['body']['fields'][] = array('subsys_dir' => 'Directory');
$structure['body']['fields'][] = array('task_prefix' => 'Task Prefix');
$structure['body']['fields'][] = array('count' => 'Count');
By default the report body in the List View will only contain one line for each record read from the database, but there is the option to print an additional line of accumulated totals, as shown in the following sample:
Example List View with additional totals line
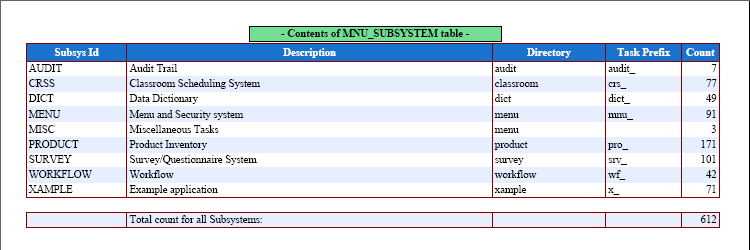
After the last database record has been printed the _cm_ListView_total() method will be called to obtain an additional row of data. If a non-empty associative array is returned the details will be appended to the report. Note that this array should contain the same column (field) names that were printed in the body of the report
By default the report body in the List View will only contain one line for each record read from the database, but there is the option to print any number of additional lines both before and after each database record, as shown in the following sample:
Example List View with additional line breaks
After each database record has been read you can use either or both of the following methods:
Note that the above sample also includes the totals from Example List view (with totals).
Here is a sample of a Detail view that shows each database record on a separate page. The data is shown in a simple vertical arrangement, one field on each line with labels on the left and data on the right
Example Detail view (single)
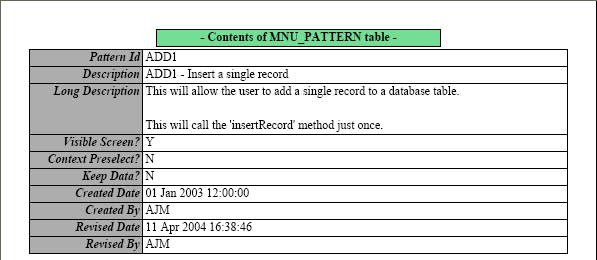
The above sample Detail view was produced with the following code in the report structure file:
// set column widths
$structure['columns'][] = array('width' => 40, 'halign' => 'right');
$structure['columns'][] = array('width' => 150, 'halign' => 'left');

// identify labels and data to be output
$structure['body']['fields'][] = array('pattern_id' => 'Pattern Id');
$structure['body']['fields'][] = array('pattern_desc' => 'Description');
$structure['body']['fields'][] = array('pattern_long_desc' => 'Long Description');
$structure['body']['fields'][] = array('visible_screen' => 'Visible Screen?');
$structure['body']['fields'][] = array('context_preselect' => 'Context Preselect?');
$structure['body']['fields'][] = array('keep_data' => 'Keep Data?');
$structure['body']['fields'][] = array('created_date' => 'Created Date');
$structure['body']['fields'][] = array('created_user' => 'Created By');
$structure['body']['fields'][] = array('revised_date' => 'Revised Date');
$structure['body']['fields'][] = array('revised_user' => 'Revised By');
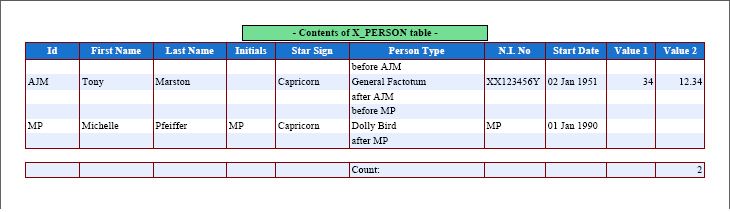
This is a variation of the Detail view which shows more than one field and associated label on the same line.
Example Detail view (multiple)
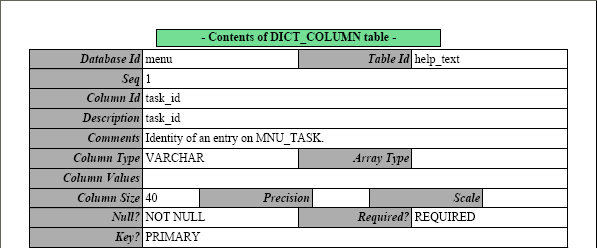
The above sample Detail view was produced with the following code in the report structure file:
// set column widths
$structure['columns'][] = array('width' => 40, 'halign' => 'right');
$structure['columns'][] = array('width' => 150, 'halign' => 'left');

// identify labels and data to be output
$structure['body']['fields'][1][] = array('label' => 'Database Id', 'width' => 40);
$structure['body']['fields'][1][] = array('field' => 'database_id', 'width' => 55);
$structure['body']['fields'][1][] = array('label' => 'Table Id', 'width' => 40);
$structure['body']['fields'][1][] = array('field' => 'table_id', 'width' => 55);

$structure['body']['fields'][2] = array('column_seq' => 'Seq');
$structure['body']['fields'][3] = array('column_id' => 'Column Id');
$structure['body']['fields'][4] = array('column_desc' => 'Description');
$structure['body']['fields'][5] = array('comment' => 'Comments');

$structure['body']['fields'][6][] = array('label' => 'Column Type', 'width' => 40);
$structure['body']['fields'][6][] = array('field' => 'col_type', 'width' => 55);
$structure['body']['fields'][6][] = array('label' => 'Array Type', 'width' => 40);
$structure['body']['fields'][6][] = array('field' => 'col_array_type', 'width' => 55);

$structure['body']['fields'][7] = array('col_values' => 'Column Values');

$structure['body']['fields'][9][] = array('label' => 'Column Size', 'width' => 40);
$structure['body']['fields'][9][] = array('field' => 'user_size', 'width' => 20);
$structure['body']['fields'][9][] = array('label' => 'Precision', 'width' => 40);
$structure['body']['fields'][9][] = array('field' => 'col_precision', 'width' => 20);
$structure['body']['fields'][9][] = array('label' => 'Scale', 'width' => 40);
$structure['body']['fields'][9][] = array('field' => 'col_scale', 'width' => 30);

$structure['body']['fields'][10][] = array('label' => 'Null?', 'width' => 40);
$structure['body']['fields'][10][] = array('field' => 'col_null', 'width' => 55);
$structure['body']['fields'][10][] = array('label' => 'Required?', 'width' => 40);
$structure['body']['fields'][10][] = array('field' => 'is_required', 'width' => 55);

$structure['body']['fields'][12] = array('col_key' => 'Key?');
This is a variation of the Detail view which shows multiple rows of additional data which have been obtained from another database table.
Example Detail view (additional)
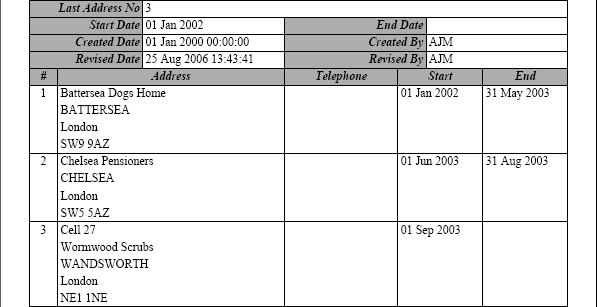
The above sample Detail view was produced with the following code in the report structure file:
     .....     .....     .....     .....     .....     .....
$structure['body']['fields'][15][] = array('label' => 'Revised Date', 'width' => 40);
$structure['body']['fields'][15][] = array('field' => 'revised_date', 'width' => 55);
$structure['body']['fields'][15][] = array('label' => 'Revised By', 'width' => 40);
$structure['body']['fields'][15][] = array('field' => 'revised_user', 'width' => 55);

// label for related columns
$structure['multi1']['fields'][1][] = array('label' => '#', 'width' => 10, 'halign' => 'center');
$structure['multi1']['fields'][1][] = array('label' => 'Address', 'width' => 80, 'halign' => 'center');
$structure['multi1']['fields'][1][] = array('label' => 'Telephone', 'width' => 40, 'halign' => 'center');
$structure['multi1']['fields'][1][] = array('label' => 'Start', 'width' => 30, 'halign' => 'center');
$structure['multi1']['fields'][1][] = array('label' => 'End', 'width' => 30, 'halign' => 'center');

// data for related columns
$structure['multi2']['fields'][1][] = array('field' => 'address_no', 'width' => 10, 'halign' => 'center');
$structure['multi2']['fields'][1][] = array('field' => 'address_long', 'width' => 80);
$structure['multi2']['fields'][1][] = array('field' => 'telephone_no', 'width' => 40);
$structure['multi2']['fields'][1][] = array('field' => 'start_date', 'width' => 30);
$structure['multi2']['fields'][1][] = array('field' => 'end_date', 'width' => 30);
Here is an example which uses the fill_alternate option:
Example Detail view (additional) with fill_alternate option

Here is an example Footer that can appear at the bottom of every page.
Example Footer

The above sample Footer was produced with the following code in the report structure file:
// define contents of page footer
$structure['foot1'][] = array('type' => 'date',   'align' => 'left', 'style' => 'textalignleft');
$structure['foot1'][] = array('type' => 'pageno', 'align' => 'center');
$structure['foot1'][] = array('type' => 'time',   'align' => 'right', 'style' => 'textalignright');

$structure['foot2'][] = array('text' => 'Radicore Software Limited', 'align' => 'center');
 - or -
$structure['foot2'][] = array('text' => '%%company_name', 'align' => 'center');
Because each page can be constructed from one or more occurrences from one or more database tables, and each element can be styled as positioned as required, it is possible to construct output documents which are quite complex. Below is a sample invoice which contains the following:
Example Invoice
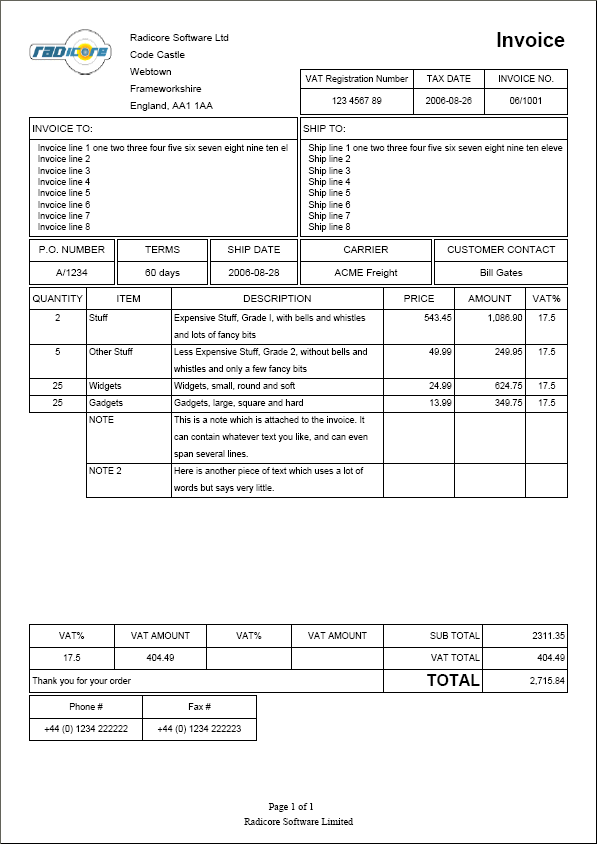
The code to produce this output is included in the software download as part of the EXAMPLE Prototype. On the 'List Person' screen there is a buttons called 'Invoice (PDF)'.
Here is a sample Label view which has 3 labels per row, 7 rows per page. Other combinations can be configured as required.
Example Address labels (3-UP)
The code to produce this output is included in the software download as part of the EXAMPLE Prototype. On the 'List Option' screen there are buttons called 'LABELS (2-UP)' which produces 2 labels per line and 'LABELS (3-UP)' which produces 3 labels per line.
Here are some miscellaneous functions which you can use:
| $this->pdf->AddPage(); | Will start a new page, causing Footer() to be called to close the current page followed by Header() to write the headings at the top of a new page. |
| $this->pdf->SetLeftMargin(n); | Will set the left margin to a custom value. |
| $this->pdf->SetTopMargin(n); | Will set the top margin to a custom value. |
| $this->pdf->SetRightMargin(n); | Will set the right margin to a custom value. |
| $this->pdf->SetMargins($left,$top,$right); | Will set the left,top,right margins to custom values. |
| $this->pdf->SetAutoPageBreak(true, n); | Enables or disables the automatic page breaking mode. When enabling, the second parameter is the distance from the bottom of the page that defines the triggering limit. By default, the mode is on and the margin is 2 cm. |
| $this->pdf->getLinesRemaining($height) | This will return the number of lines remaining on the current page. If a value for $height is not supplied it will default to the height of the last line. |
Here are some variables which you can use:
| $this->pdf | This is a reference to the PDF object (from std.pdf.class.inc which extends the TCPDF class). |
| $this->report_structure | This is a reference to the report structure file which is being used in the current task. |
| $this->pdf_filename | This is the file name given to the output document (taken from the report structure file, but which may be modified at runtime). |
| $this->pdf_destination | This is the destination for the output document (taken from the report structure file, but which may be modified at runtime). |
| 27 Jul 2024 | Amended the Body contents (detail view - additional data) to include the fill_alternate option. |
| 10 Jul 2024 | Amended the Body contents (detail view - additional data) to give a better explanation on the use of the $iterations argument. |
| 09 Jun 2020 | Amended the FAQ to include How can I rotate column labels 90 degrees in a PDF List View?. |
| 01 May 2019 | Updated Body contents (detail view - additional data) in order to allow multiple iterations using different WHERE strings. |
| 01 Aug 2018 | Amended Body contents (detail view - additional data) to allow the border option. |
| 01 Jul 2016 | Amended Body contents (detail view - additional data) to allow the ignore_if_empty option. |
| 19 Jun 2016 | Amended the FAQ to include How can I draw a horizontal line in the title area?. |
| 01 Dec 2014 | Amended Title contents to include the ability to save and reuse 'y' co-ordinates.
Amended Column specs (list view), Column specs (detail view), Body contents (detail view - single), Body contents (detail view - multiple) and Body contents (detail view - additional data) to include the ability to set padding values. |
| 01 Jun 2014 | Amended the FAQ to include Can I change the fonts in a PDF document at runtime?. |
| 02 Mar 2013 | Amended Body contents (detail view - multiple) to include an option for images, just like title contents and footer contents. |
| 14 Apr 2012 | Amended Body contents (detail view - additional data) so that the 'multiN' entries will be performed in the order in which they were defined in the structure file. Processing of these entries will stop when there are no more entries, and not (as previously) on the first empty entry. |
| 02 Sep 2011 | Updated to include the following:
|
| 25 Aug 2011 | Added Label view.
Upgraded TCPDF library to version 5.9.112 |
| 01 Sep 2010 | Amended PDF Style File and Structure File contents to include the halign, valign and stretch options.
Upgraded TCPDF library to version 5.8.013 |
| 01 May 2010 | Amended the FAQ to include How can I change the style of a field in a PDF report?.
Upgraded TCPDF library to version 4.9.007 |
| 01 Apr 2010 | Amended PDF Style File to allow the use of the ignore_if_empty option.
Amended Title Contents to allow the use of the print_only_once option. |
| 03 Mar 2010 | Amended Footer Contents to allow the use of an image.
Amended Page Definition to allow the page margins to be altered from the defaults. |
| 01 Oct 2009 | Amended Title Contents and Footer Contents to allow the border attribute to accept a combination of values.
Amended Example List view (with line breaks) to replace the _cm_ListView_pre_print() method with the _cm_ListView_print_before() and _cm_ListView_print_after() methods. Amended Miscellaneous to include $this->pdf->getLinesRemaining().
Upgraded TCPDF library to version 4.8.005 |
| 01 Sep 2009 | Amended Title Contents to allow the ignore_if_empty attribute on a text cell. |
| 01 Jul 2009 | Amended List View to allow the border of each cell in the line to be specified as well as the background colour of alternate lines. |
| 01 Jun 2009 | Upgraded TCPDF library to version 4.6.011 |
| 01 May 2009 | Amended Miscellaneous to include a list of variables. |
| 01 Apr 2009 | Amended Title Contents to allow the path name of an image file to be specified as '%%name' so that the name can be provided at runtime. |
| 01 Mar 2009 | Upgraded TCPDF library to version 4.5.018 |
| 01 Jan 2009 | Amended Structure File contents to allow a column's width to be specified as a percentage of the page width.
Upgraded TCPDF library to version 4.4.006 |
| 01 Nov 2008 | Added a new Miscellaneous section.
Updated Body contents (detail view - single), (multiple) and (additional data) to allow 'notext' => 'y' on images to omit the file name from the output.
Upgraded TCPDF library to version 4.0.029 |
| 01 Aug 2008 | Upgraded TCPDF library to version 4.0.008, which affects the following:
|
| 01 Feb 2008 | Added Example List view (with line breaks). |
| 01 Sep 2007 | Changed PDF library from FPDF to TCPDF in order to offer support for UTF-8 Unicode fonts, and also the inclusion of Barcode Generation. |
| 25 Jul 2007 | Amended Title Contents to allow text replacement using 'type'=>'date/time/pageno'. |
| 09 Jun 2007 | Amended Footer Contents to allow text replacement by using the '%%' characters in front of a field name. |
| 15 Jan 2007 | Amended the List View to include the ability to print a line of accumulated totals at the end of the report.
Amended the List View and the Detail View to include the ability to change the style for individual cells at runtime. Please refer to FAQ #73 for details. |